 |
Fabric Flower Headbands
|
My darling cousins are about to turn 6 and 3 years old and with their birthday party fast approaching I decided to make them both something handmade to add to their gifts. Rachel and Courtney are very girlie and they rarely leave home without being decked out from head-to-toe! My little dollies are always well accessorized so I decided I would try to make some headbands that would coordinate with their Fall wardrobes:)
I recently learned how to make rolled fabric flowers which are simple to make and can be used to dress-up just about anything! I made an adorable wreath earlier this year using a grape vine wreath and fabric flowers in shades of green (my favorite color). The wreath is packed away in the attic but I will be sure to post a photo when I pull it out in the Spring. These flowers are also cute glued on ribbons, clips or pins to embellish gifts, clothing, hairdos, etc....these flowers are a crafty gem and the possibilities are endless! Since I was making the headbands for little ladies I decided to make 3 flowers per headband.
 |
| Rolled Fabric Flowers |
Supplies:
- Fabric (I used 3 different patterns, 1/4 yard of each to make approximately 18 fabric flowers)
- Fabric glue
- Scissors or rotary cutter
- Ruler or rotary cutting mat with ruler
- Headbands (I purchased 6 fabric covered headbands but an alternative could be hair clips or pins)
 |
| Supplies |
 |
| Step One |
Step One: Cut the fabric pieces into 2" wide by 22" inch long strips. With these measurements, I was able to cut approximately 10 strips per 1/4 yard of fabric. The length of the fabric strip determines the width of the flower, a 22'' strip makes a flower approximately 1" wide (small). To make a larger flower I usually use 2 to 3 strips.
I used my rotary set to more accurately cut the strips however it's okay to eyeball the measurements if you are using scissors.
 |
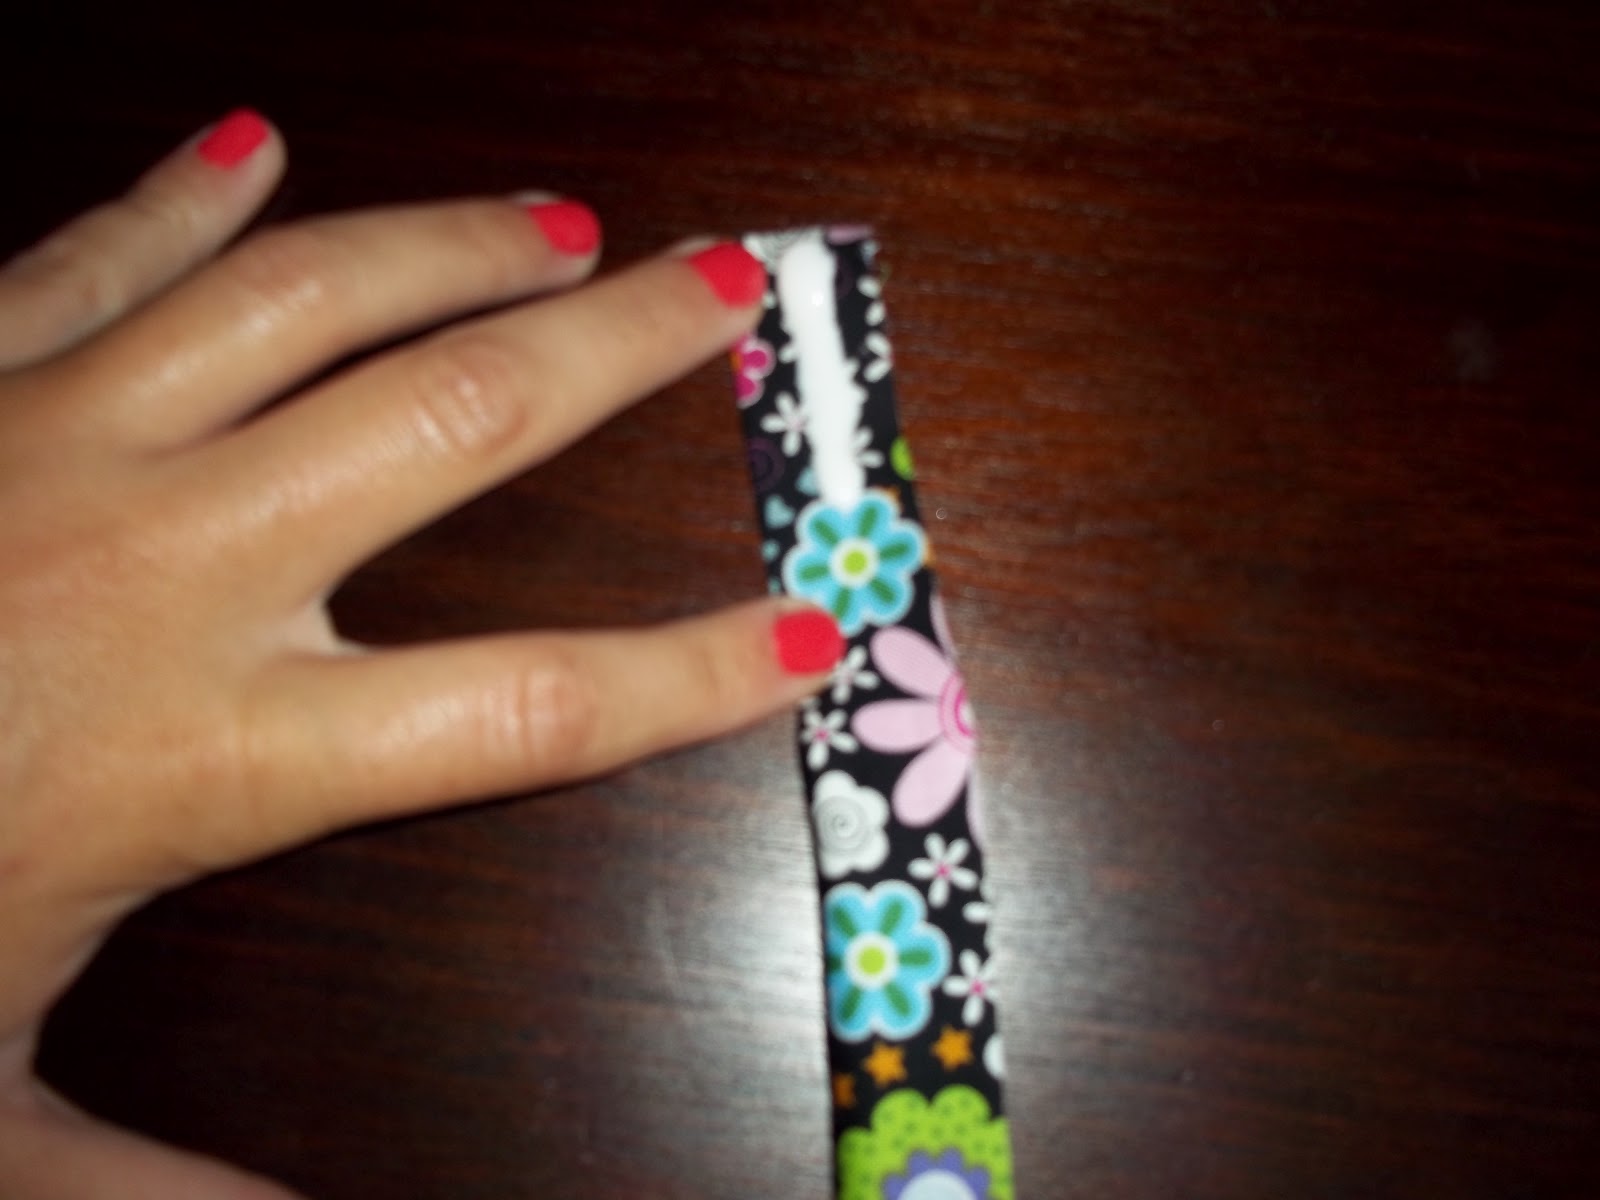
Step Two
|
Step Two: Once the fabric strips are cut, begin by folding your strip in half (lengthwise) and applying about a line of fabric glue top to bottom.
 |
| Step Three |
Step Three: Begin rolling your fabric strip about 7 or 8 times. This will be the center of the flower.
 |
| Step Four |
Step Four: Keep a tight hold on the center with one hand and with your other hand start twisting the fabric around the center in a counter clock-wise direction, placing a small dot of glue every other twist to secure. I usually place a good amount of glue on a piece of cardboard ahead of time and use my finger tip to apply the glue while twisting. The more you twist the fabric, the tighter rolled the flower will be.
 |
| Step Five |
Step Five: Keep twisting your fabric strip around the center and when you get to the end of the strip, glue the end down to the side of
the flower. If you want to make a larger
flower, take an additional strip of fabric, fold in half (lengthwise), apply a
dot of glue and continue twisting. The
more strips added on, the larger the flower.
The flower in this picture was made using two 22" strips of fabric.
 |
| Step Six |
Step Six: After the glue on your flowers are dry, use fabric glue or a hot glue gun to attach as desired. I used my hot glue gun to attach the fabric flowers, one at a time to the headbands. I glued three flowers per headband.
 |
| Rolled Fabric Flowers |
It took me a few evenings to make enough flowers for the headbands. Once you get into the groove of twisting and gluing, you will be surprised just how simple and fun these flowers are to make:)
 |
| Headbands:) |
As a finishing touch, I placed the flower headbands in clear cello bags tied with white tulle. I wanted to be sure the headbands didn't get smashed when wrapped with the matching pink ruffle tops and comfy boot cut jeans I purchased for the girls. The headbands are darling and I will try to snap a photo of the girls wearing them at their birthday party.
I am kind of on a roll with making the rolled fabric flowers and like I said before, once you get moving and grooving with making them the possibilities are endless! My cousin Taylor's birthday party is also coming up and I had some extra fabric quarters in my craft box so I decided to make her a headband to match the outfit I bought her. Taylor is going into the second grade so I decided to get a little thicker headband and I discovered that is much easier to mount the rolled flowers onto a thicker surface.
 |
| Pink fabric flowers on a thicker headband |
 |
| Rolled Fabric Flowers |
By the way, I forgot to mention before that the color of the fabric is much more important than the pattern. Once the flowers are rolled the pattern isn't really visible, just the colors. The fabric that I used to create the flowers for this headband had a bright pink background with large green, yellow and orange flowers.
 |
| Flower Headband:) |
All of the flower headbands I made are adorably cute, but I do think the bright pink flowers on the thicker pink headband is my favorite! I am excited to see what else I can beautify with these crafty treasures!
 |
| Fabric Flower Hair Pins |
Lauren


1 comment:
I LOVE your fabric flowers. If Baby Crabb comes out to be a little girl, I will be placing an order.
Post a Comment